I’ve been working on a big migration project for several months now, and I would like to share my experiences with you to make your migration go as smooth as possible.
One of the most common words you will hear while doing a migration is downtime.
When you ask your business people if there can be any downtime their answer will be quite straight forward: NONE!
In this post I would like to show you how to achieve that on a SQL server level on following editions: Enterprise BI and Standard.
Let’s look at all the functionalities we can use:
-
Enterprise
- High Availability groups
- SQL Server Replication
- Database Mirroring
- Logshipping
-
BI
- SQL Server Replication
- Database Mirroring
- Logshipping
-
Standard
- SQL Server Replication
- Database Mirroring
As you can see we have a lot of tools to achieve our goals. My personal preferred method is the one of SQL Server Database mirroring, in this post I will be continuing by explaining how to set up Database mirroring between 2 servers and how to successfully failover and make sure you can still go back should things go wrong. I’ve chosen to go in deeper on Database mirroring because this is available in Enterprise, BI & Standard edition, and these were the versions I was aiming at for my no downtime scenario.
Let’s get started…
We commence by setting up two database instances on a Hyper-V Server
After this we create a database on the ‘old’ server which we are going to migrate to the ‘new’ server.
/****** Object: Database [MirroringDB] Script Date: 9/12/2014 15:40:52 ******/
CREATE
DATABASE [MirroringDB]
CONTAINMENT =
NONE
ON
PRIMARY
( NAME =
N’MirroringDB’,
FILENAME
=
N’?\YourLocation\MirroringDB.mdf’
,
SIZE = 5120KB , MAXSIZE =
UNLIMITED, FILEGROWTH = 8192KB )
LOG
ON
( NAME =
N’MirroringDB_log’,
FILENAME
=
N’?\YourLocation\MirroringDB_log.ldf’
,
SIZE = 2048KB , MAXSIZE = 2048GB , FILEGROWTH = 8192KB )
GO
We first backup our database with a FULL & Transaction log backup. (make sure your log chain isn’t broken, otherwise mirroring will not start)
FULL
BACKUP
DATABASE [MirroringDB] TO
DISK
=
N’?\YourLocation\MirroringDB.bak’
WITH
NOFORMAT, NOINIT, NAME =
N’MirroringDB-Full Database Backup’,
SKIP, NOREWIND, NOUNLOAD, COMPRESSION,
STATS
= 10
GO
LOG
BACKUP
LOG [MirroringDB] TO
DISK
=
N’?\YourLocation\MirroringDB.trn’
WITH
NOFORMAT, NOINIT, NAME =
N’MirroringDB-Full Database Backup’,
SKIP, NOREWIND, NOUNLOAD,
STATS
= 10
GO
We then proceed by restoring these backups on the ‘new’ server. Do not forget to put on the WITH NORECOVERY OPTION.
USE [master]
RESTORE
DATABASE [MirroringDB] FROM
DISK
=
N’?\YourLocation\MirroringDB.bak’
WITH
FILE
= 1,
NORECOVERY, NOUNLOAD,
STATS
= 5
RESTORE
LOG [MirroringDB] FROM
DISK
=
N’?\YourLocation\MirroringDB.trn’
WITH
FILE
= 1,
NORECOVERY, NOUNLOAD,
STATS
= 5
GO
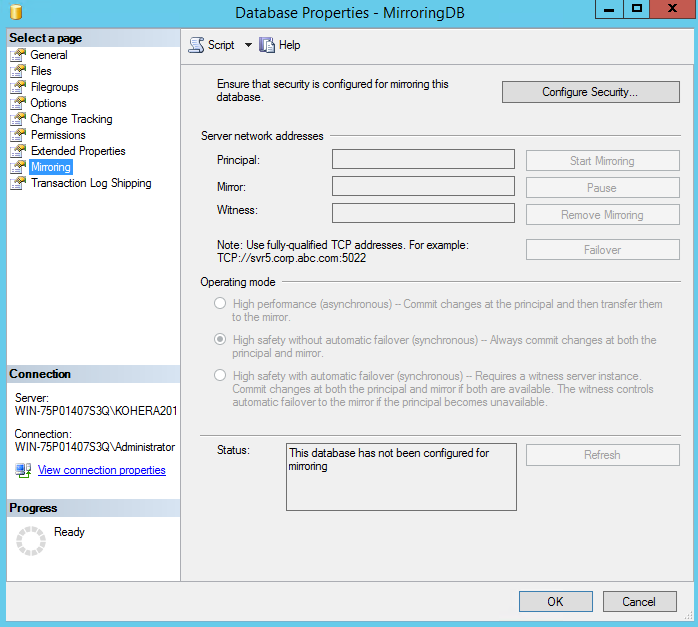
When we have created the database and restored the backup with no recovery, I’ll go into the database properties of the ‘old’ SQL Server database
We choose the mirroring tab and click configure security
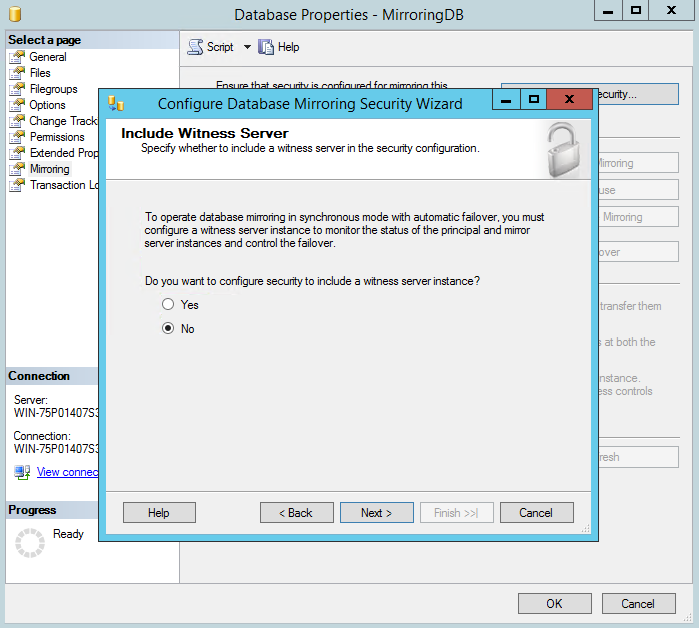
We click next on the first screen and choose not to use a witness
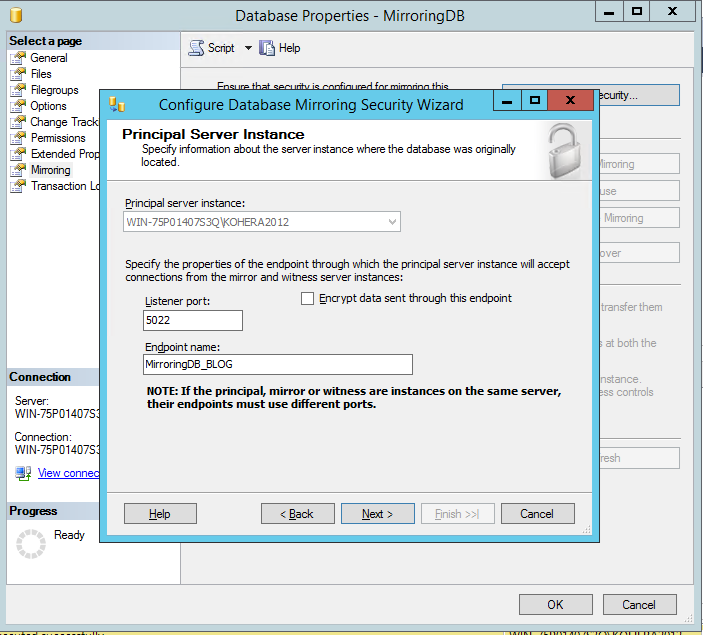
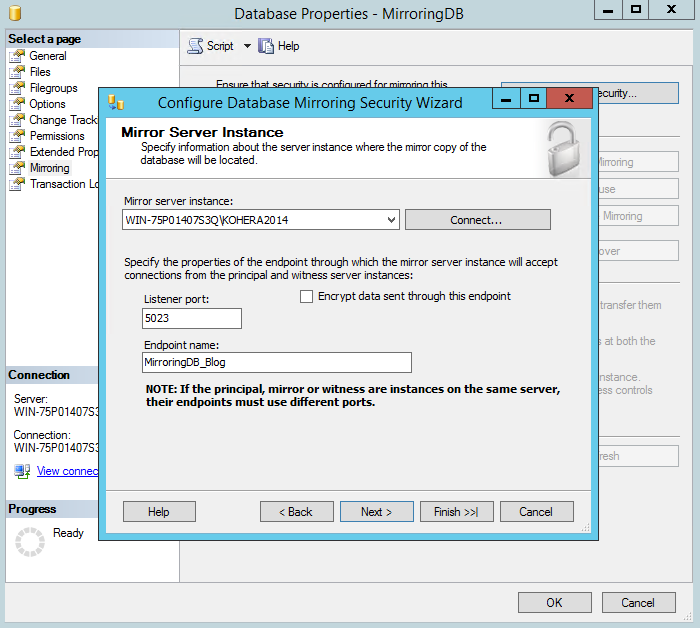
In the next screen we configure the endpoint. It is important to use a port that is not being used by a Machine. Since we are using one virtual machine and two instances, I will be using different ports for the two instances. 5022 & 5023. If we would be migrating cross server you can use 5022 for both endpoints
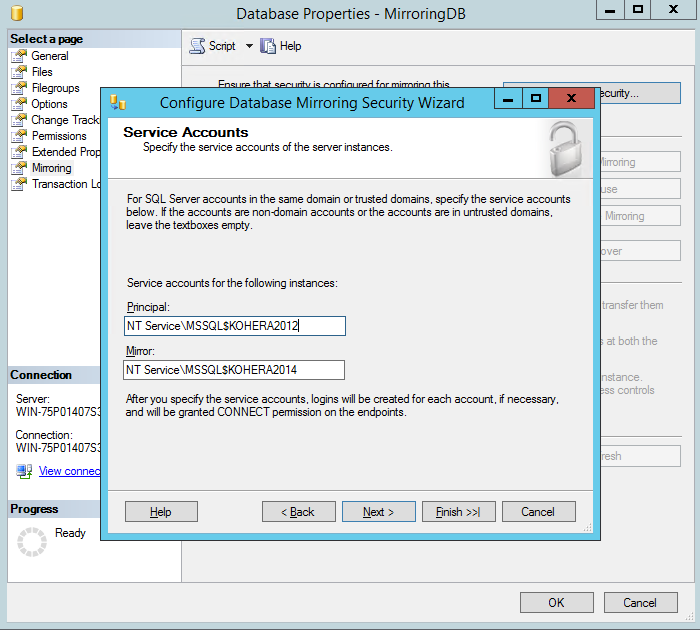
In the next screen we will give in the service accounts of the 2 instances. This is an example so no AD-accounts were used. It is the default SQL server windows account.
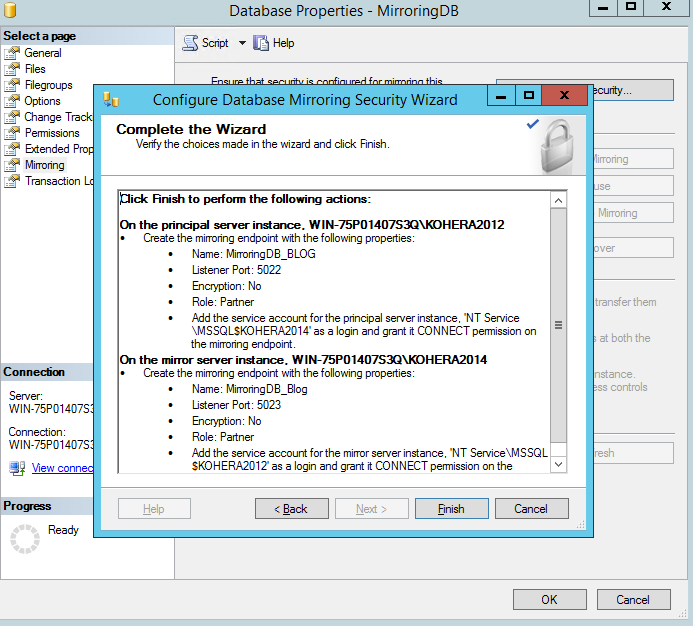
When we click finish the SQL server database migration will be configured by wizard.
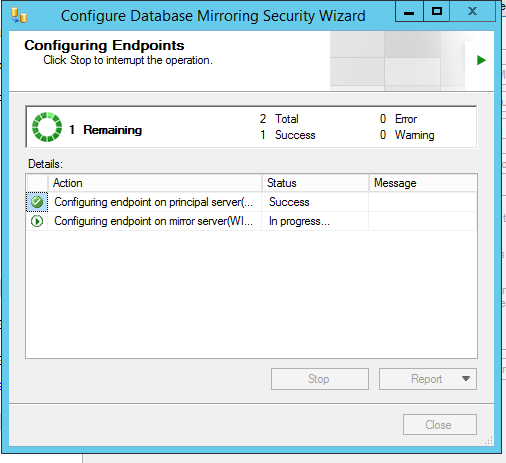
Then click on start mirroring
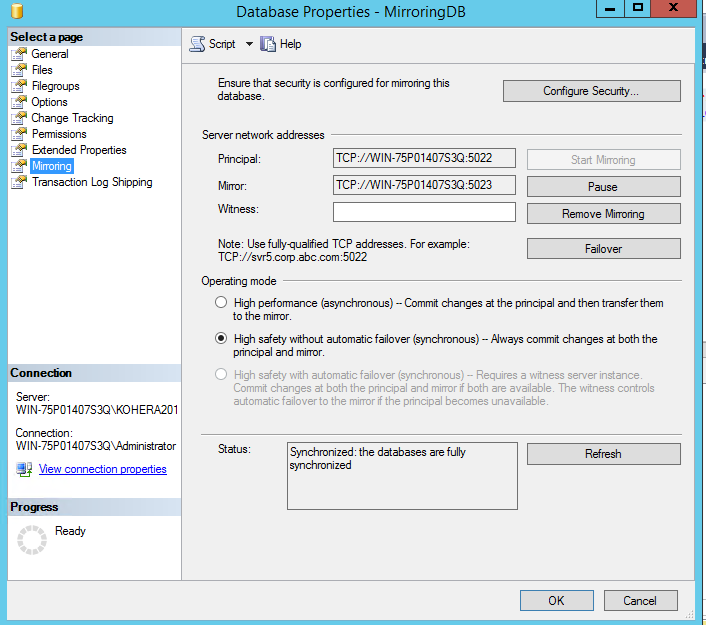
Then the mirroring should start and you should see something like this
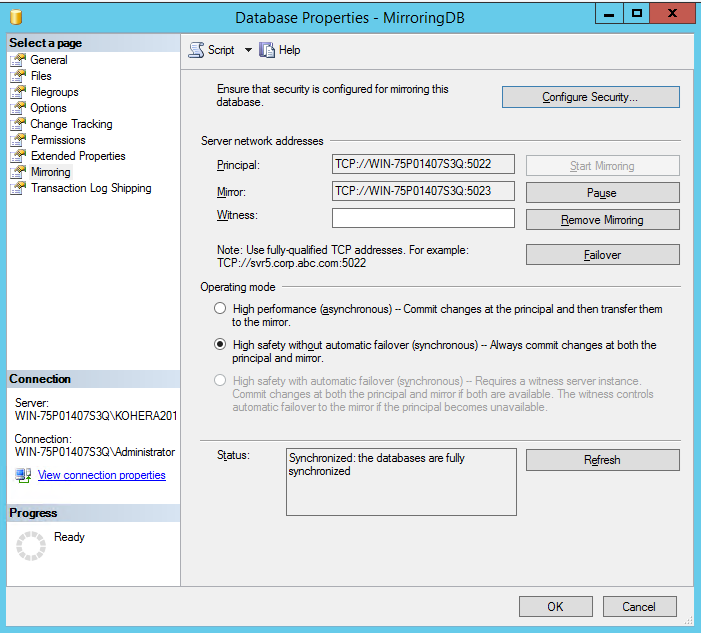

Now the mirroring has been set up between the two servers.
This concludes the setup of the SQL database mirroring. We now have the database running in sync. The next step is failing over the database to the new server, thus making the ‘new’ server the active one.
We start by taking a last backup to make sure we can go back should anything fail.
BACKUP
DATABASE [MirroringDB]
TO
DISK
=
?\YourLocation\MirroringDB2.bak’
WITH
NOFORMAT, NOINIT, NAME =
N’MirroringDB-Full Database Backup’,
SKIP, NOREWIND, NOUNLOAD,
STATS
= 10
GO
Now we go back to the database mirroring properties screen of our old server. We can see that there is a button called Failover.
When we click it
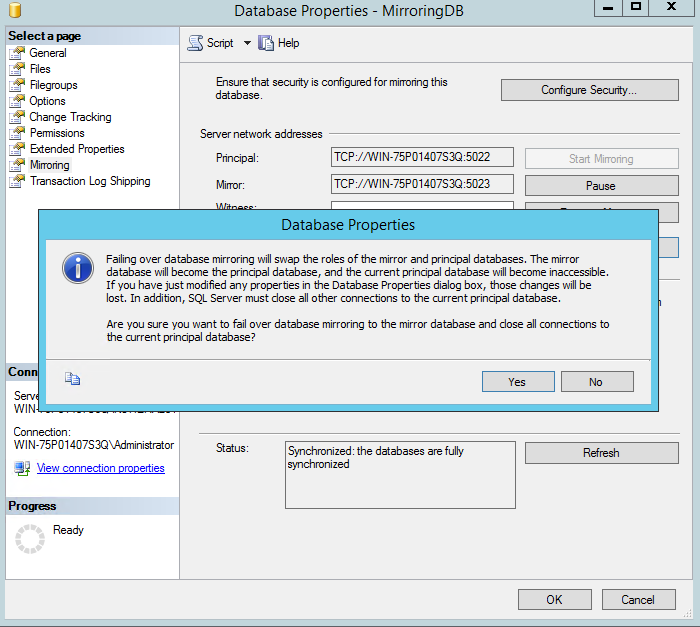
Click yes in this screen.
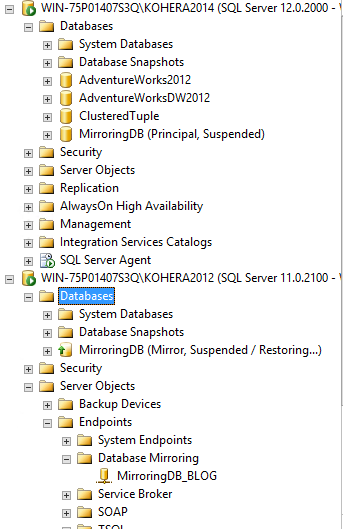
After this we see that the mirroring has been suspended and the database is now running on the new server. This was achieved with no data loss and practically no downtime. (On SQL server level). It is important to know that the old database has now a restoring state and will not be able to be used again. So should things fail, you have to restore the backup we took just before we failed over. The only thing left to do now is remove the mirroring and we have successfully migrated a database between a SQL SERVER 2012 server and a SQL SERVER 2014 server. We can achieve this by clicking remove mirroring in the database properties mirroring screen of the principal database(the new one).
After you removed the mirroring you should see something like below.
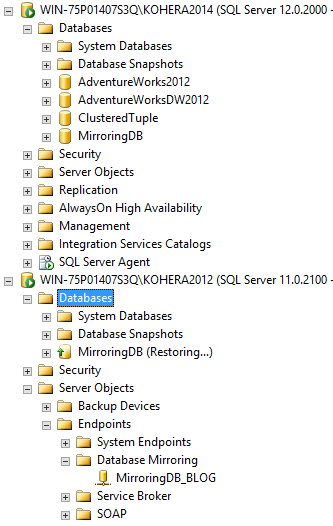
As we can see in the image above we have successfully migrated the database.
This concludes my post on how I migrate a SQL Server Database, I know this is not the bulletproof way of migrating databases. That’s why in future posts I will be explaining other scenario’s for migration. For myself this and the Always on availability groups have proven to be the most easy to set up and resilient option. That’s why in my next post I will be talking about the setup of always on availability groups.