Today I would like to explain a bit more on Workload Management in Dedicated SQL Pools. Workload management is one of the tools you can use to ensure a smooth-running workload by leveraging different groups with classifiers.
This is one of the features that is sometimes overlooked by customers and is one of the key components to deal with concurrency issues and the “noisy neighbor” issue.
What is a workload group?
In Dedicated SQL pools you can define 8 custom workload groups in which you can handle resource allocation.
These workload groups are there on top of the existing static and dynamic groups which are not in scope of this blog (more information can be found at https://docs.microsoft.com/en-us/azure/synapse-analytics/sql-data-warehouse/resource-classes-for-workload-management).
By default, any user that logs in to your DB will be allocated to the dynamic smallrc resource class unless specified otherwise.
In a workload group you have a bunch of configuration options which I will be explaining in this post. You can configure your workload group by either T-SQL or by using the GUI in the portal on the Workload Management Pane of the Dedicated SQL Pool.
These are all configurable options for Workload Groups:
- Min. Resources%
- Min. & Max Resources % per Request
- Cap Resources %
- Concurrency Range
- Effective Values
- Classifiers
- Request Importance
- Query Execution Timeout
All these configuration items are linked together and you should have a good understanding of each of them to ensure that your workload management is configured in the best possible way.
Min Resources %
Let’s start off with Min Resources %. This setting will allow you to reserve a certain percentage of your total capacity for your workload group. This means that the resources are guaranteed and cannot be taken by any other resource group. This has the side effect that, if you are not using the workload group capacity you will lose that capacity.
If you would like to set up a workload group with Min. Resources % you need to either go to the GUI and set the following setting:

Or you can set it by using the following command in TSQL
CREATE WORKLOAD GROUP [SOMENAME]

WITH

(

MIN_PERCENTAGE_RESOURCE = 10,

--CAP_PERCENTAGE_RESOURCE = 100,

--REQUEST_MIN_RESOURCE_GRANT_PERCENT = 5

);
Min. & Max Resource per Request
Next to Min Resource %, we have our next setting called Min & Max Resource per request. This setting will allow you to set the min & max percentage of your capacity for each request in the workload group. By default, the Max Percentage per request will be set the same as the Min Percentage per request.
The minimal Resource percentage per Request is the minimal number of resources a request will get when they are identified in the workload group.
When you alter the Max Percentage per request from the default to a higher value than the Min Percentage per Request, each request will take resources between the min and max percentage per request. This is decided by the system and is dependent on the resource availability and current workload.
The min percentage per request is configurable to the smallest percentage allowed in your DWU tier, the full list of configurable values with their respective DWU level can be found here: https://docs.microsoft.com/en-us/azure/synapse-analytics/sql-data-warehouse/memory-concurrency-limits#concurrency-maximums-for-workload-groups
You can set it by the GUI
If you want to do this for Min.Resources % per request it is in the regular Workload Management pane:
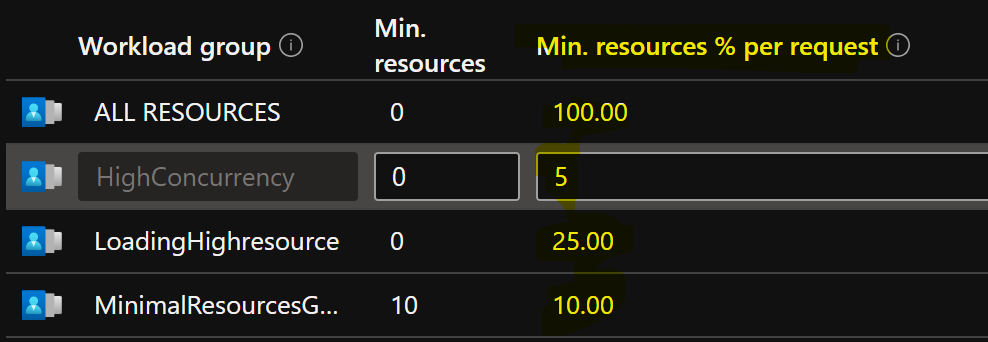
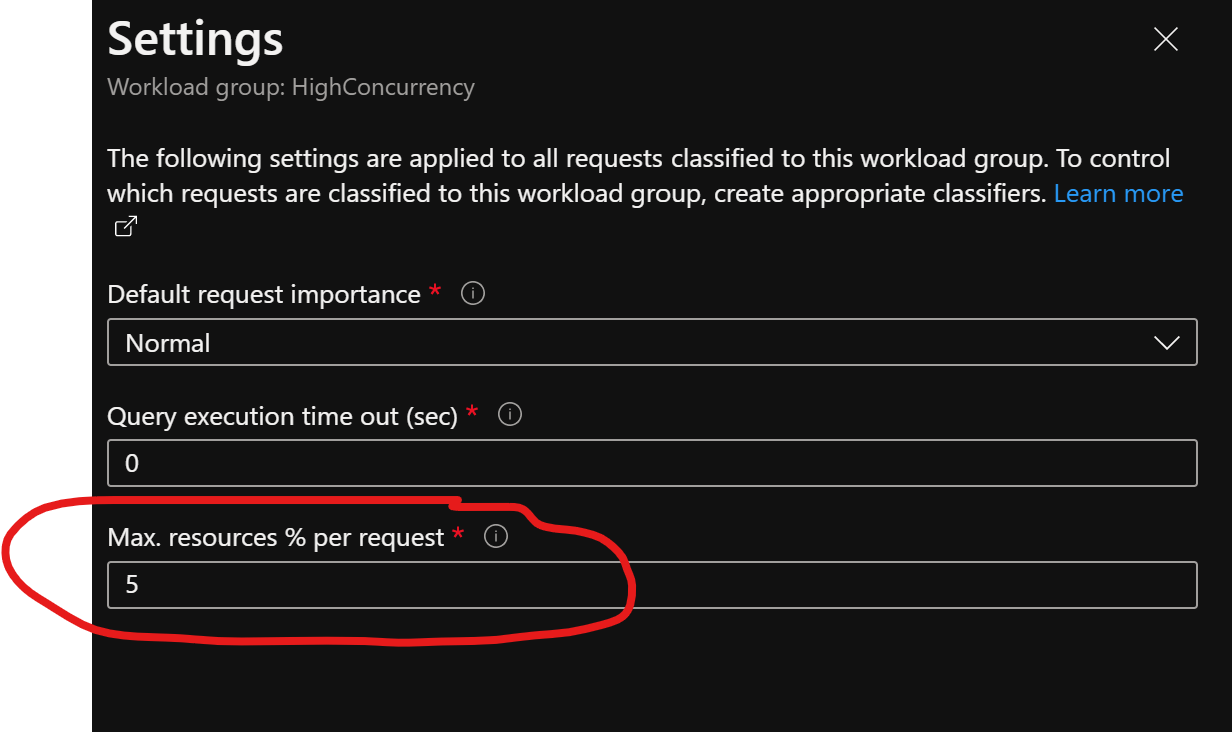
For Max. Resources % you need to go into the setting of your workload group by clicking on the three dots at the end of the workload group.

Or you can set this by T-SQL
CREATE WORKLOAD GROUP [SOMENAME]

WITH

(--MIN_PERCENTAGE_RESOURCE= 0

--, CAP_PERCENTAGE_RESOURCE = 100

, REQUEST_MIN_RESOURCE_GRANT_PERCENT = 10

, REQUEST_MAX_RESOURCE_GRANT_PERCENT = 20

)
Cap Resources %
With the Cap Resources %, you can set the maximum number of resources (DWU) a resource group can possibly consume. You can set multiple resource groups to consume 100% of the resources, if the resources are taken then queuing with priority will apply or the first in first out principle.
You can set this setting using the GUI

Or you can set this using T-SQL
CREATE WORKLOAD GROUP [SOMENAME]

WITH

(  -- MIN_PERCENTAGE_RESOURCE = 0

, CAP_PERCENTAGE_RESOURCE = 100

--, REQUEST_MIN_RESOURCE_GRANT_PERCENT = 10

--, REQUEST_MAX_RESOURCE_GRANT_PERCENT = 20

)
Concurrency Range
The concurrency range is not really a setting as such; however, it is calculated based on the settings you have given to your workload group. It will calculate the min and max number of concurrent queries you can potentially run with this workload group.
Example 1:

REQUEST_MIN_RESOURCE_GRANT_PERCENT = 5
CAP_PERCENTAGE_RESOURCE = 50
MIN_PERCENTAGE_RESOURCE = 0
This will give you a concurrency range of 10 as 10 queries can fit into the 50% capped resources using the 5% min resource grant percentage. The range will start at 0 as potentially other resource groups/ static groups or dynamic groups can take the resources of your workload group.
Example 2:

REQUEST_MIN_RESOURCE_GRANT_PERCENT = 5
CAP_PERCENTAGE_RESOURCE = 50
MIN_PERCENTAGE_RESOURCE = 10
This will also give you a concurrency range of 10 as 10 queries can fit into the 50% capped resources using the 5% min resource grant percentage. The range starts at 2 as we have reserved 10% of resources for the workload group which cannot be taken by any other group.
Effective Values
The effective values show us the actual values which are currently being used by the workload group management. These can differ from the actual values that we entered as settings for our workload group.
Example 1:
no differences

As you can see the effective values which we gave as parameters are also applied, however let’s see what happens if we try to give a cap resources to 100% when we have another workload group with 10% reserved capacity.
Example 2:

As you can see, we have configured our workload group with a cap resource of 100%, however the resource group HighConcurrency has 10% resources reserved which then is automatically corrected in the effective “running” values. The ALL Resources workload group is capped at 90% instead of the configured 100%.
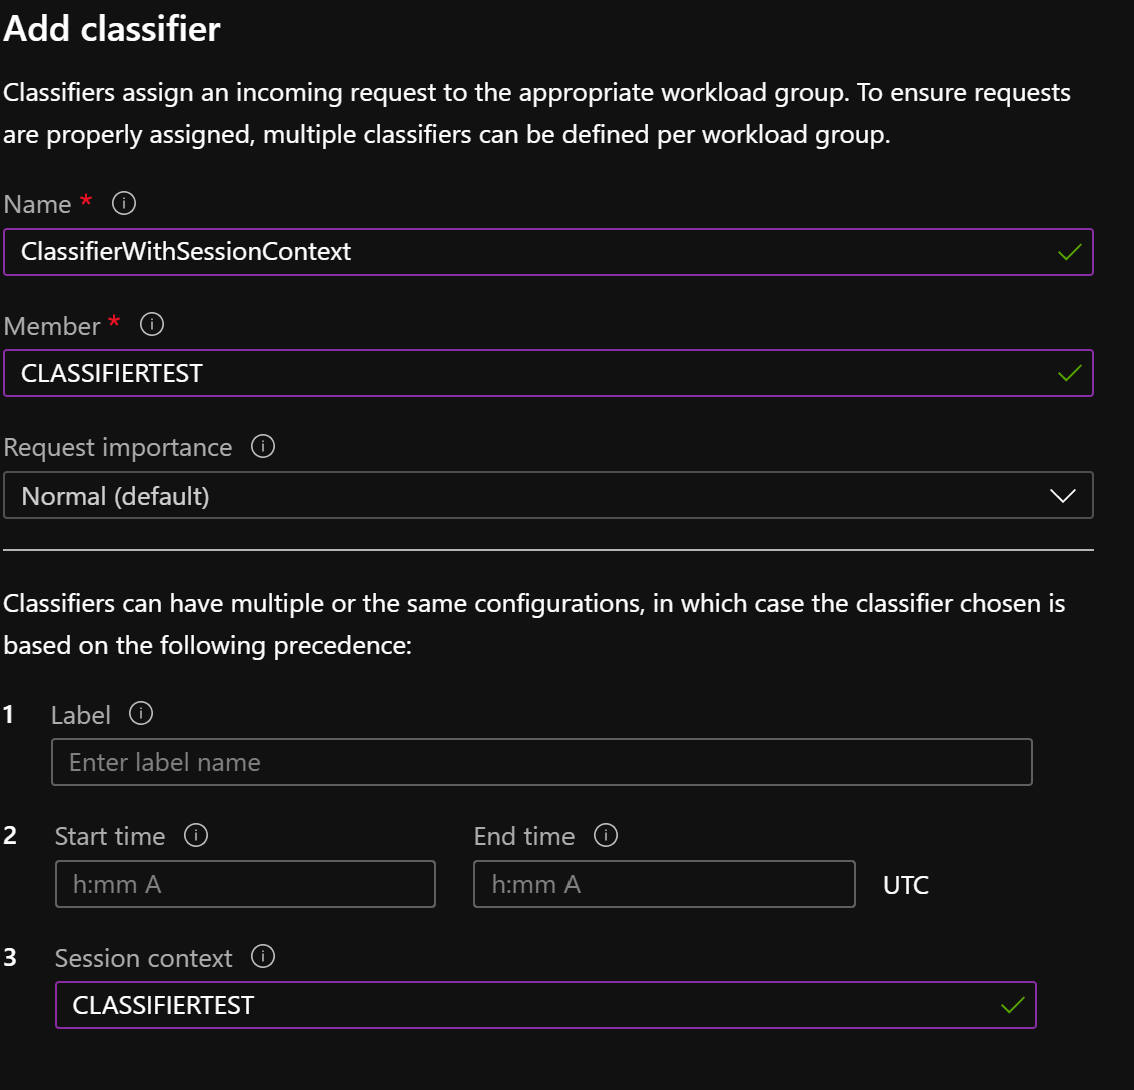
Classifiers
No workload management without Classifiers, if you do not have a classifier no workload groups will be used. To configure users to be “classified” into a workload group, you need to configure classifiers. One workload group can have multiple classifiers and a classifier can be set at user/group/role level.
A classifier has the following settings which can be configured
- Name
- This is the name of your classifier
- Member
- This can be a single user (AD or SQL), an AD group or a role. All users configured as members can potentially use the workload group they have been configured in as a classifier
- Request Importance
- This can be set to low, below normal, normal, above normal and high. When all concurrency slots of the workload group are used, by default all queries are queued and will work in a First in First out principle. With Request importance a classifier with a higher priority will jump the queue and get their queries executed before queued queries with lower importance.
- Label
- When using the Option(LABEL) in your queries equal to this configured value, these queries can be classified by their label as well. The label option is an optional parameter
- Session Context
- When using the sys.sp_set_session_context, you can classify queries to this workload group as well if the set sessions context value is equal to the configured value. The Session Context option is an optional parameter
- Start time and End Time
- When setting a start time and an end time, your user will be classified against this workload group only between the specified timeframes. This option is also an optional parameter
If multiple of these classifiers exist for the same user a weighting exercise is performed. The following table represents how the weighting happens(source: CREATE WORKLOAD Classifier (Transact-SQL) – SQL Server | Microsoft Docs)
| Classifier Parameter | Weight |
| USER | 64 |
| ROLE | 32 |
| WLM_LABEL | 16 |
| WLM_CONTEXT | 8 |
| START_TIME/END_TIME | 4 |
Example 1
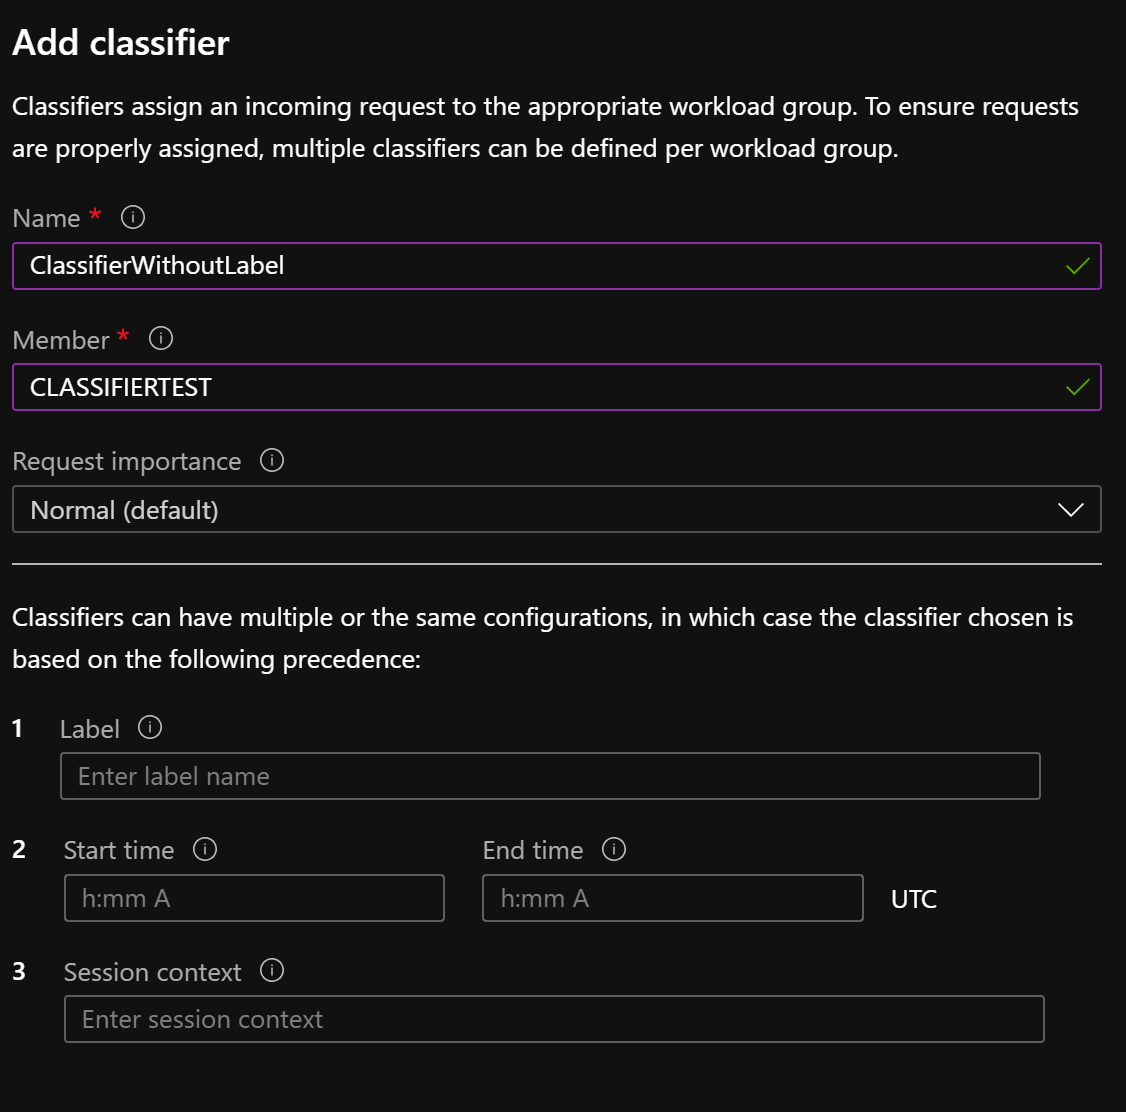
let’s create a classifier which uses label to direct users to the workload group ALL Resources and if we are not using the label we have a classifier to direct users to the HighConcurrency workload group
WORKLOAD_GROUP = ‘ALL RESOURCES’
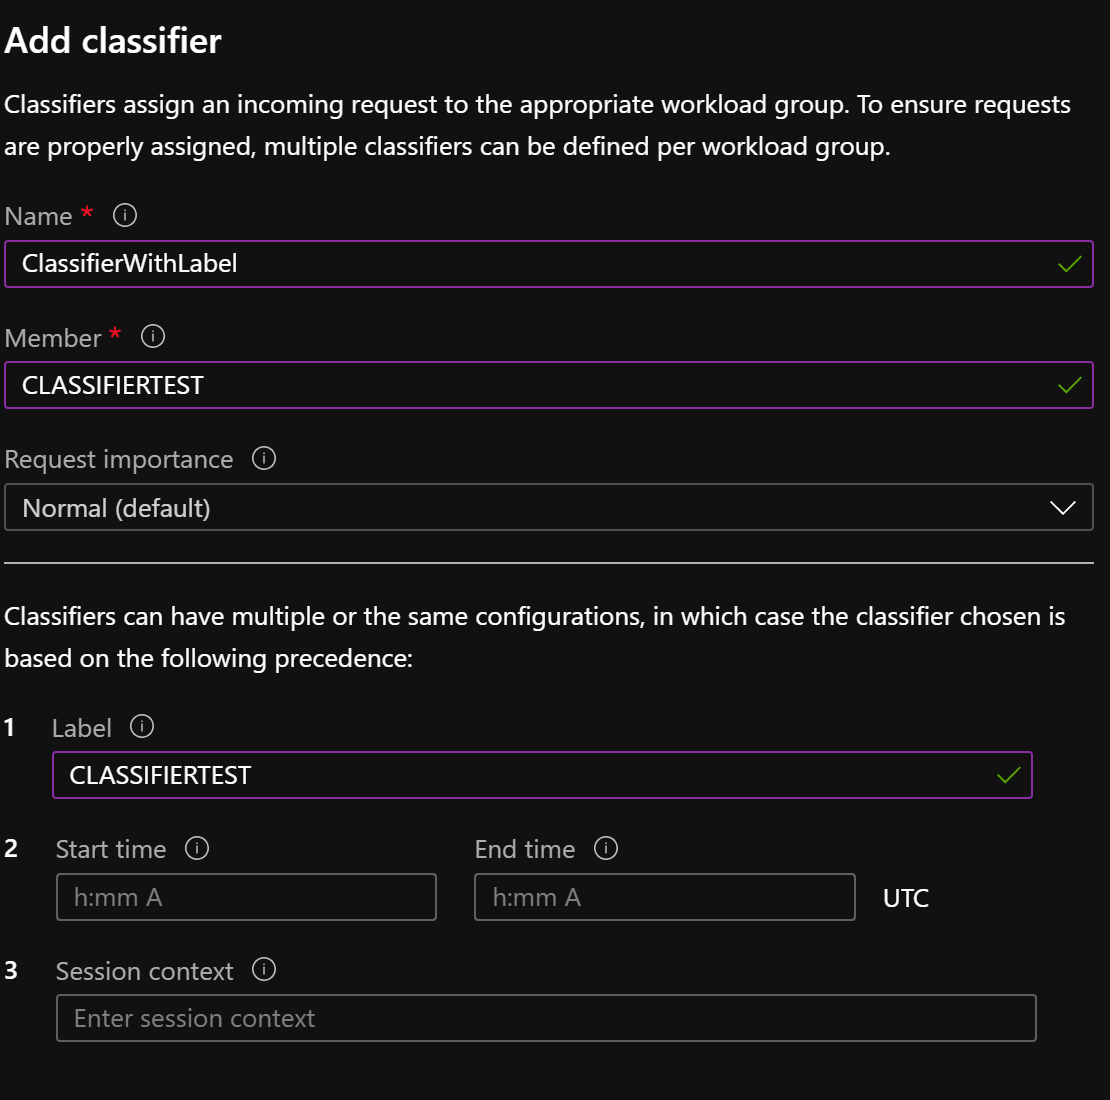
WORKLOAD_GROUP = ‘HighConcurrency’
Let’s execute two queries now with and without a label and see what workload groups the queries are classified to
SELECT TOP 1000 * FROM dbo.taxi_CCI;

SELECT TOP 1000 * FROM dbo.taxi_CCI OPTION(LABEL='CLASSIFIERTEST')
If we check the DMV’s we can see the following
select r.command, r.resource_class, s.login_name from sys.dm_pdw_exec_requests r

inner join sys.dm_pdw_exec_sessions s on r.session_id = s.session_id

As you can see in the picture above, the query with the label is directed to the ALL Resources workload group and the one without the label is directed to the HighConcurrency workload group.
Example 2:
let’s create a classifier which uses label to direct users to the workload group ALL Resources and a classifier which uses session_context to direct users to the workload group HighConcurrency.
WORKLOAD_GROUP =’ALL RESOURCES’

WORKLOAD_GROUP = ‘HighConcurrency’
When we execute the following query
EXEC sys.sp_set_session_context @key = 'wlm_context', @value = 'CLASSIFIERTEST';

SELECT TOP 1000 * FROM dbo.taxi_CCI;

SELECT TOP 1000 * FROM dbo.taxi_CCI OPTION(LABEL='CLASSIFIERTEST');
We can see in the dmv’s that the query in the same context but with a label will be set to the ALL RESOURCES group as LABEL has a higher weight than Session Context

This means that you will always be classified to the classifier which has the highest weight depending on the configured LABEL, CONTEXT, START and ENDTIME
Request Importance
Next to the request importance we can configure at classifier level we can also configure a default Request Importance for the workload group to which classifiers default to if not specified otherwise.
This is an optional setting and will use Normal as a default if it is not specified. Request importance is a setting which comes into play when all requested resources are not available on the server (if the cap resources % of the group is set to 100) or when the cap limit of the resource group has been reached.
The request importance will bypass the first in first out mechanism and queries will be able to jump the queue based on their importance. Queries with the same importance level will go back to the First in First Out principle on their importance level.
Example
Let’s create two resource groups which have the following settings
CREATE WORKLOAD GROUP [W1]

WITH

(   MIN_PERCENTAGE_RESOURCE = 0

, CAP_PERCENTAGE_RESOURCE = 100

, REQUEST_MIN_RESOURCE_GRANT_PERCENT = 25

, IMPORTANCE = HIGH

)


CREATE WORKLOAD GROUP [W2]

WITH

(   MIN_PERCENTAGE_RESOURCE = 0

, CAP_PERCENTAGE_RESOURCE = 100

, REQUEST_MIN_RESOURCE_GRANT_PERCENT = 25

, IMPORTANCE = BELOW_NORMAL

)
I will create a classifier for each of them with one user in them without specifying any other request importance
CREATE WORKLOAD CLASSIFIER Classifier1 WITH

( WORKLOAD_GROUP = 'W1'

,MEMBERNAME     = 'Classifier1'

)

CREATE WORKLOAD CLASSIFIER Classifier2 WITH

( WORKLOAD_GROUP = 'W2'

,MEMBERNAME     = 'Classifier2'

)
I will then start 6 long running queries of W2 and after that 1 query for W1
When we run the following DMV:
SELECT s.login_name, r.resource_class, r.classifier_name,r.importance,r.submit_time,r.start_time

FROM sys.dm_pdw_exec_requests r

inner join sys.dm_pdw_exec_sessions s on r.session_id = s.session_id

WHERE r.status not in ('Completed','Failed','Cancelled') and  resource_class is not null

ORDER BY submit_time DESC;
We get the following result:
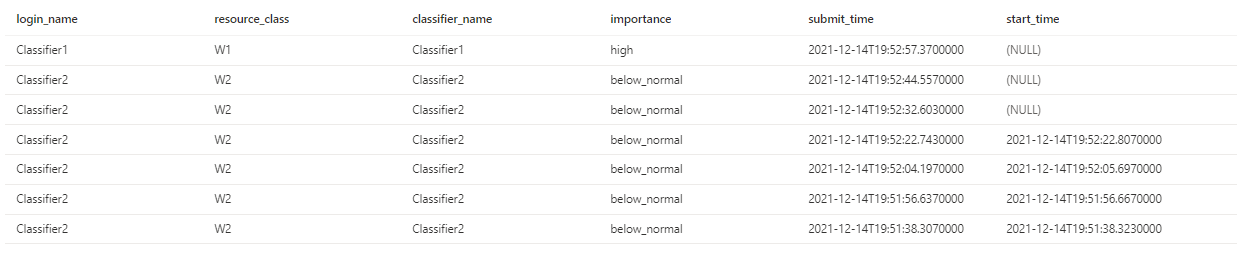
4 concurrent queries can run (25 min request % capped at 100%), and 3 queries are queued, 1 of the workload group with High importance and 2 of the workload group with Below normal importance.
If we cancel a query, we can see that the High importance query starts executing while it has a later submit time.

That is how workload importance works, if I now do the same test and add two queries of the W1 workload group, the High Importance group will have a First in First out principal before letting the below_normal importance workload group execute its queries.

You can compare the Workload importance to the fast passes you can get at a theme park, you will still have to wait but you will have to wait less than the normal queue.
Query Execution Timeout in Sec
The final setting we will talk about is the query execution timeout in sec, to ensure that in a workload you do not get queries running for hours/days hogging one of your precious concurrency slots you can set the query to timeout after a certain time has passed. This is a very effective setting when you have users execute runaway queries.
You can set this in the GUI by going to the settings of a workload group by pressing the three dots at the end of the workload group.
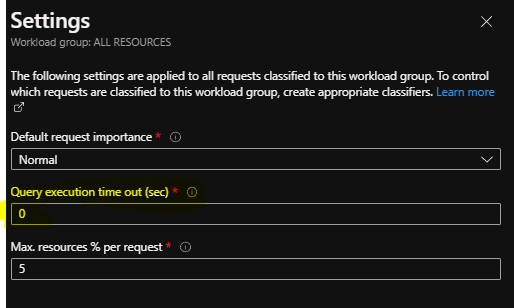
Or you can set this using T- SQL
CREATE WORKLOAD GROUP [somename]

WITH

(  -- MIN_PERCENTAGE_RESOURCE = 0

--, CAP_PERCENTAGE_RESOURCE = 50

--, REQUEST_MIN_RESOURCE_GRANT_PERCENT = 5

, QUERY_EXECUTION_TIMEOUT_SEC = 60 ;

)
Summary
I’d like to start off this summary by pointing out how powerful Workload management is. It is a very handy tool for tuning and stabilizing workloads on Synapse Dedicated SQL pools. In this post I tried to show you all angles of workload management and give you an idea how to configure it. Hope you enjoyed it and can start tackling your workloads with an effective workload management configuration.
Thank you for reading!
![]()